
OpenWRT 14.0x 버전을 19.07버전으로 업그레이드
14.0x 버전이 더이상 opkg update link를 지원하지 않기 때문에 파이썬 3.x버전 이상 설치를 하려면 OpenWRT를 최신버전으로 업데이트 시켜주어야한다.
https://openwrt.org/toh/views/toh_fwdownload?dataflt%5BBrand*%7E%5D=hi&dataflt%5BModel*%7E%5D=hlk
Table of Hardware: Firmware downloads
Table of Hardware: Firmware downloads This table shows firmware download urls for all devices listed in the Table of Hardware. ---------- Using the Table of Hardware * Sort the columns by clicking the column header * Enter your filter criteria
openwrt.org
위의 링크를 타고가면 지원하는 제품군의 OpenWRT sysupgrade 바이너리 파일을 받을 수 있다.
HLK-7688A의 sysupgrade 바이너리 파일
openwrt-19.07.6-ramips-mt76x8-hilink_hlk-7628n-squashfs-sysupgrade.bin
Uart0 rx tx 를 PC와 <Teraterm> 57600 1stop noparity 로 연결하고 아래 코드를 입력
uci show network // lan port를 통한 연결성을보여줌
uci set network.lan.proto=dhcp
uci commit

// 외부에서 luci 웹인터페이스 접근하기위한 firewall 설정
uci set firewall.@zone[1].input=ACCEPT
uci set firewall.@zone[1].output=ACCEPT
uci set firewall.@zone[1].forward=ACCEPT

/etc/init.d/network restart // dhcp로 재시작함
랜선을 공유기를 통해 연결하면 자동할당ip를 받게되는데,명령어로 그 ip주소를 알아낸다.
ifconfig브라우저를 열어, 해당 ip주소를 입력하면 Luci Web Interface에 들어갈수 있다. ( ID:root / PW:root )
Luci Web Interface - system - firmware - upgrade 에 위에 바이너리 파일을 넣고 업그레이드. (2~5분 소요)
완료되면 자동으로 reboot가 된다. 터미널에서 엔터를 치면 openwrt 콘솔로 넘어간다.
OpenWRT 19 설치된것을 확인
시스템을 초기상태로 던져주기 위해
firstboot

uci set network.lan.proto=dhcp
uci commit
/etc/init.d/network restart // dhcp로 재시작함

opkg update
opkg install python3-pyserial
파이썬파일 작성
cd /root
vi server.py
부팅시 파이썬 프로그램 자동실행
/etc/init.d/ 폴더안에 스크립트 파일을 작성해서 넣음
/etc/init.d/파일명 enable 해주면 /etc/rc.d/S파일명 또는 K파일명 등이 생기며 부팅시 자동실행됨
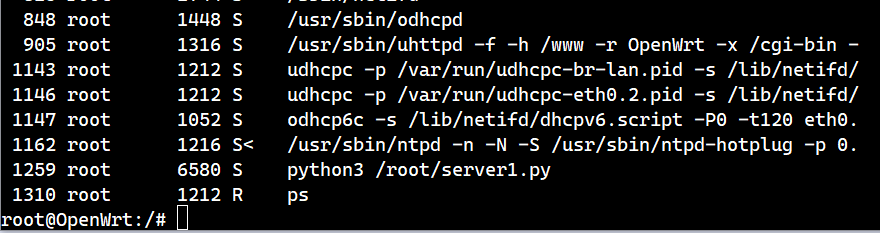
ps 프로세스 확인명령어로 프로그램이 돌아가고 있는지 확인
cd /etc/init.d
vi server_boot


root@OpenWrt:/etc/init.d# cat server_boot
#!/bin/sh /etc/rc.common
# Copyright (C) 2008 OpenWrt.org
# Updated 2021 2 1 DBICT composed by CCJ

START=99
STOP=01

start() {
        sleep 5   # make sure boot process is done, no more console msgs
        . /etc/profile
        python3 /root/server.py &
        echo "Server.py has Started"
}

stop()  {
   pid=`ps -ef | grep '[p]ython3 /root/server.py' | awk '{ print $1 }'`
    echo $pid
    kill $pid
    sleep 2
    echo "Server.py has Stopped"
}
권한 설정후 rc.d에 등록
chmod +x /etc/init.d/server_boot
/etc/init.d/server_boot enable
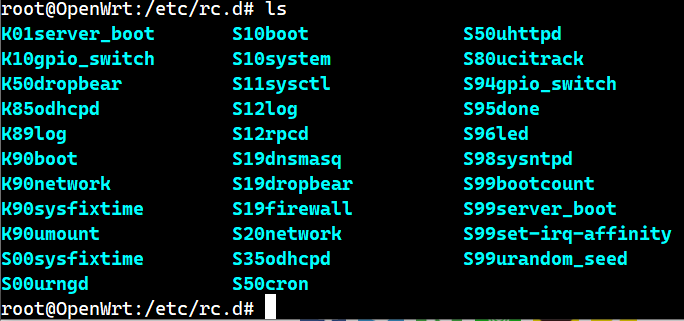
S99 server_boot 와 K01server_boot가 생긴것을 볼 수 있다.
재시작하면 프로세스가 돌아가고 있는것을 확인할 수 있다. ps입력시 실행중인 프로세스 확인
/etc/init.d/server_boot start
'임베디드 용어설명' 카테고리의 다른 글
| STM32F105 CDC라고 쓰고 USB 가상포트 라고 읽는다. (0) | 2021.04.22 |
|---|---|
| STM32F103 UART TX를 OD핀으로 쓰기. 3.3v 신호를 5v 신호로 레벨시프트(3.3 v -> 5v level shift) (0) | 2021.04.13 |
| WIZ107SR TTL to Ethernet 모듈 HW_Trig_pin CMD모드 진입 IP설정 방법 (4) | 2020.12.17 |
| ESP-EYE (ESP-IDF 설치 및 빌드) (0) | 2020.07.02 |
| Date Code 란? 데이트 코드란? (0) | 2020.03.01 |